Creating your Artist's Profile
Now that you have created an account, it's time to do some initial setup for your ARTsala profile. By following these simple steps, you'll be ready to begin organizing and sharing your art.
- If you're not currently logged in to ARTsala, navigate to our login page. From the account control page click on the setup block.
- Now, simply work your way down the profile setup page filling in all of the forms.
-
Begin with your contact information. This is the address that will appear on your consignment printouts, your receipts, and other reports. You may also choose to display this information on your ARTsala website, if you wish.
Nothing too surprising here, but one field to be aware of is the "Art Type" field.
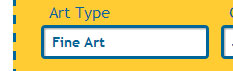
This field is optional, but if you fill it in, the contents will appear on your ARTsala website next to your name, like this: "John Doe | Fine Art", or "Jane Smith | Sculpture".
When you are finished entering your information, click the "Save" button and return to your profile setup page.
-
We recommend that you upload a profile picture on the profile picture page. This picture will appear, along with your biographical information, on your ARTsala website. If you choose to share your artwork with other gallery sites through ARTsala, your picture will appear on the gallery sites as well. For additional information on uploading images, please see our image uploading page. Now, click the "Save" button and return to your profile setup page.
- Now upload your logo (optional) on the artist logo page. If you upload a logo, it will appear on your printed reports and forms, and also on some of the ARTsala website themes. Again, if you need additional information on uploading images, please see our image uploading page. Click the "Save" button and return to your profile setup page.
-
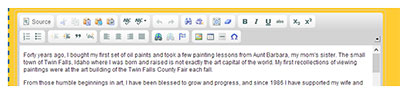
You may now upload your biography on the biography setup page. The interface for entering your biography is a lot like word processing software. You can type your biography in plain text, or you can format the text as needed. We recommend keeping formatting to a minimum, to avoid conflicts with your site design. If, for example, you change the color of the text, your text may not display as desired on some ARTsala site themes.
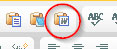
IMPORTANT!!! If you are copying your text from Microsoft Word, please make sure that you use the special paste from Word button on the tool-bar (instead of ctrl+v or command+v). Word adds a lot of markup to its text. The markup helps display the text the way you want it in Word, but it wreaks havoc online. The paste from Word button strips out (most of the) markup and gives you clean text.
To paste properly, simply open your file in Word, highlight the text you want to use and copy it. Now place your cursor inside the bio box on your biography setup page and click on this button:
- You can follow the same basic process to enter your artist's statement and resume.
-
Now you're ready to set up your media. ARTsala is customizable so that as you are entering new artwork you only see options that are relevant to your art. If you are primarily an oil painter, you may only wish to see "Oil" as an option in the medium drop-down menu. A sculptor might wish to see "Bronze", "Marble", and "Steel" as options.
Your media setup page allows you to customize this experience.
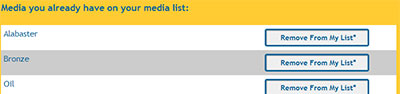
On the media page you will see a list of media currently in your list, along with the option to remove them from your list. Please note that if you remove art from the list, it simply hides the medium in your drop-down menus, it doesn't delete the medium from ARTsala, nor does it change the media of artwork already entered into the system.
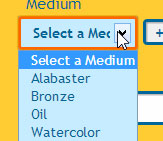
Initially you won't have any media available in your list. Use the Select Medium drop down to initially add media to your list - click the "Add This to Your List of Media" button.

If you don't see your media in this drop-down list you can click on the "add your own" link and type in your medium.

You may add as many media as you need.
-
Setting up your subject matter is very similar to setting up your media. Again, adding or removing subject matter only removes it from your list of subjects, it doesn't affect artwork already assigned a subject.
Sales Tax. Finally, if you plan to use ARTsala to manage sales and print receipts, you should set up your sales tax.
You may set up different sales tax percentages for different areas where you will make sales. You might have one tax profile for your local area (which might include a combination of your city and state sales tax) and another for an area where you travel to participate in a show. You might also set up a tax profile for exempt sales.
Setting up sales tax profiles here is easy, but sales tax itself can be complicated. If you have any questions about what sales tax you should be charging, please check with your local taxing authority, or with your accountant.
That's it - you've now set up your profile and you're ready to begin entering art into ARTsala.